 November 11, 2015: sales of GreekKeys 2008 ceased on October 28. The updated product GreekKeys 2015 is now available at the web site of the Society for Classical Studies (free to SCS members, $20 for non-members, free or discounted for those who purchased GreekKeys 2008 on or after August 1, 2014). Click here for the new sales and support site. November 11, 2015: sales of GreekKeys 2008 ceased on October 28. The updated product GreekKeys 2015 is now available at the web site of the Society for Classical Studies (free to SCS members, $20 for non-members, free or discounted for those who purchased GreekKeys 2008 on or after August 1, 2014). Click here for the new sales and support site.
Installation in Mac OS X
If you are upgrading from the GreekKeys 2005 version
If you have GreekKeys Unicode from the GreekKeys 2005 package installed on your computer for use by all users (in the top-level Library folder), the installer will overwrite it, and you do not need to do anything before running the 2008 installer.
If you have GreekKeys Unicode from the GreekKeys 2005 package installed in your user's Library folder for use only by your own user, you should turn off the input(s) in System Preferences International and remove the file GKUall.bundle (version 2.1 or 2.0) from the Keyboard Layouts folder before running the 2008 installer.
Important information for installing under Mountain Lion (OS X 10.8), or Mavericks (OS X 10.9), or Yosemite (OS X 10.10)
Because of the new Gatekeeper security mechanism introduced in 10.8, installers created in the past are by default blocked from opening. If you double-click on the Installer, you will see this warning:
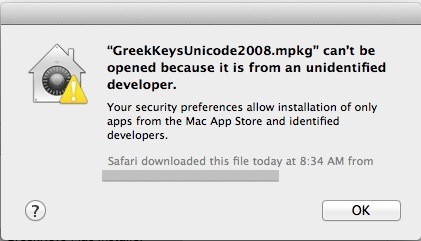
You need not and should not change your Security Preferences in response to this. Instead, click on OK to dismiss the warning. Then control-click or right-click on the Installer icon and in the contextual menu that appears select the command Open. When you do this you will see the following dialog:

Just click on Open and you will be able to proceed with the installation as usual
Running the installer
Installation is easily performed by a standard Mac OS X Installer package entitled GreekKeysUnicode2008.mpkg. This is located in the folder GreekKeys Mac Installer.
1. Save your work in other applications and quit them.
2. Double-click on GreekKeysUnicode2008.mpkg to launch the installer and follow the steps as explained on screen.
3. The default location of installation is the startup volume, but you may click on "Change Install Location" to select another volume if you wish.
4. The default installation is for GreekKeys Unicode inputs only, but you may click on "Customize" if you wish to install the deprecated Traditional GreekKeys keyboards or the experimental GKU decomposed inputs.
5. When the installer reports success, click on "Restart." (Or if you installed on a volume other than your startup volume click on "Close.")
6. After the restart, follow the steps for ACTIVATION, given below.
Location of installation: by default, the GreekKeys Unicode inputs are installed in /Library/Keyboard Layouts of the selected volume of your Mac and will be available to all users on that volume. If for some reason you wish to restrict the availability of these inputs to a single user, then drag the bundle file(s) out /Library/Keyboard Layouts and into username/Library/Keyboard Layouts, then log out and log in again.
What is installed: the default installation is named GKUall.bundle; the optional installations are named GKUdcmp1.bundle and GKUdcmp2.bundle and GKTraditional.bundle.
Activation in Mavericks (10.9) and Yosemite (10.10)
Mavericks (10.9) introduced some rearrangement in the System Preferences and a redesign of the tab for activating inputs, and Yosemite (10.10) has the same features.
1. Be sure you have restarted after running the installer or installing manually.
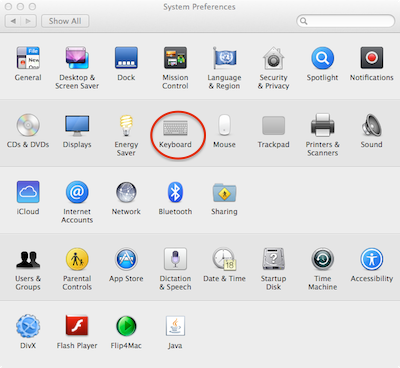
2. Open System Preferences and select Keyboard.
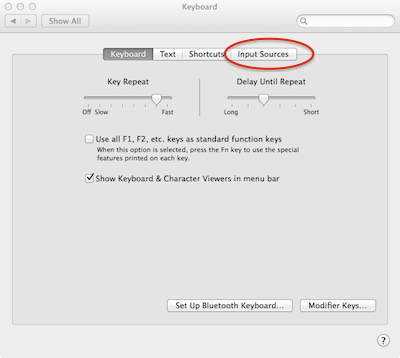
3. Select the Input Sources tab.
4. Click on the + sign to add a keyboard that is not already shown as active.
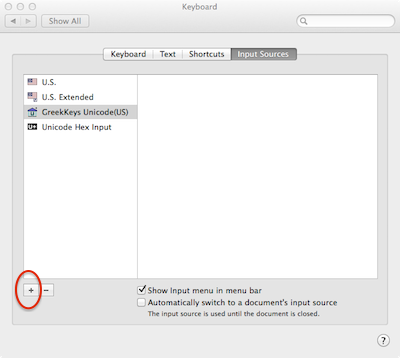
5. Select Others on the left side in order to see a scrolling list of the GreekKeys Unicode keyboards.

6. Select the keyboard(s) you want to use and click on Add.
Activation (before 10.9)
NOTE: if you installed over GreekKeys Unicode from the 2005 release, then the input(s) you previously activated will still be activated, and you may skip this.
1. Be sure you have restarted after running the installer or installing manually.
2. Open System Preferences (from the Dock or under the Apple menu).
3. In the System Preferences window, click on International [in 10.5 or earlier] or Language & Text [in 10.6].
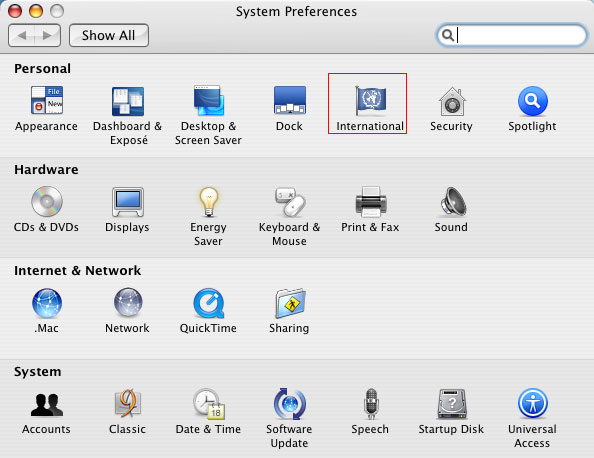
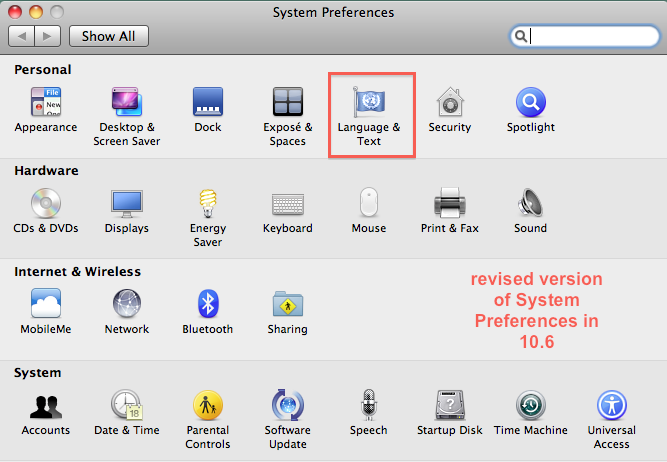
4. Select the Input Menu pane of International [in 10.5 or earlier] or Input Sources pane of Languages & Text [in 10.6].
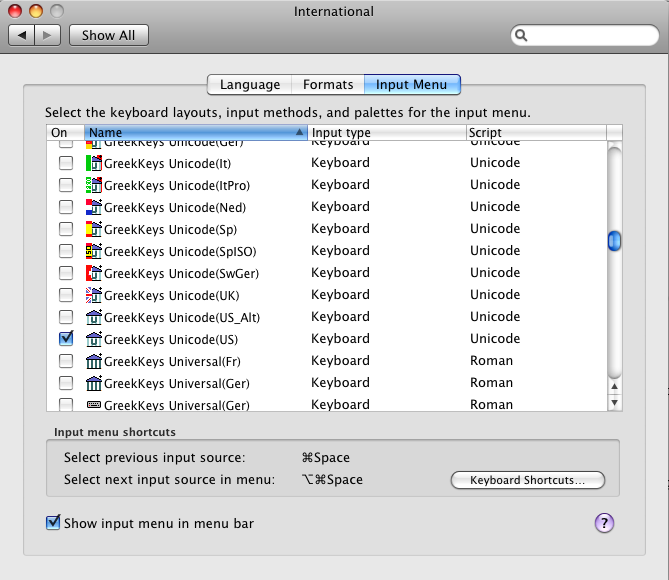

5. Scroll through the list of inputs and enable the item or items you wish to use by checking the box in front of the name.
6. Make sure that "Show input menu in menu bar" is checked.
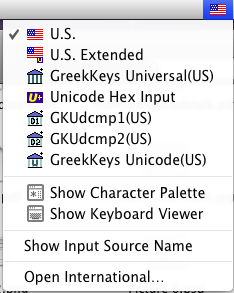
7. Close System Preferences. You should now see an input menu among those at the right side of the menubar. If your main language is US English, you will see a US flag, and if you open the menu you will see other choices, such as the Greek temple icon with superimposed U for GreekKeys Unicode(US).
Mac Font Installation 10.9 or later
The easiest way to install fonts in recent versions of OS X is to simply double-click on them. If you have not previously installed earlier versions of the fonts (New Athena Unicode, KadmosU, BosporosU, AttikaU), follow these steps:
1. Open the Unicode Fonts folder in the downloaded GreekKeysUnicode2008 folder.
2. Double-click on the .ttf file for each font you want to install, and you will see a preview window like this for each font:
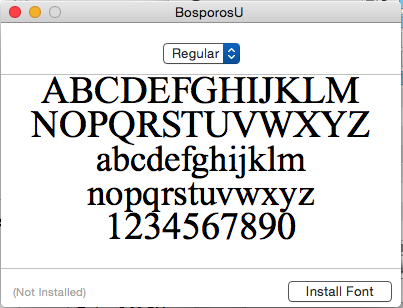
Click on Install Font.
If you do already have versions of the fonts on your system, then it is best to take two preliminary steps before installing.
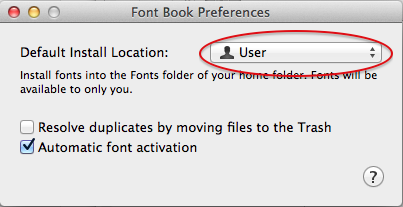
1. Open the application Font Book and check the preferences to determine where added fonts will be installed. You can select whether the font is installed in the user's Library/Fonts folder or the top-level Library/Fonts folder.
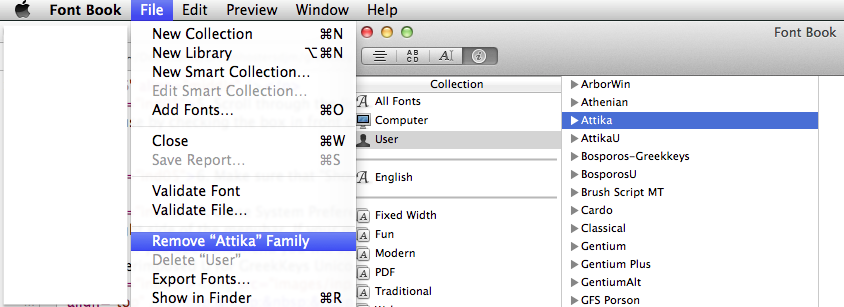
2. Remove any previous version of the same font in Font Book.
Now proceed to double-click on the font files you want to install, as explained above.
Mac Font Installation (in 10.8 or earlier)
To ensure that all font caches used by the system are updated properly, it is strongly recommended that you install fonts by using the application FontBook.app that is present in the Applications folder of your OS X Mac.
1. Save all your work in open applications and quit those applications.
2. If you have previously installed earlier versions of New Athena Unicode, AttikaU, BosporosU, or KadmosU font, open FontBook, select All Fonts in the sidebar, and locate the old font(s). Select an old font and use the dropdown action menu (gear icon) to remove it.
3. Now select either User or Computer in the sidebar of FontBook's window. If you select User, the new fonts will be available only to the active user. If you select Computer, the fonts will be available to all users of the computer.
4. Use the dropdown action menu (gear icon) to select the command "Add fonts"
5. Select the folder Unicode Fonts in the GreekKeys 2008 package to install all four fonts, or select an individual font within it to install an individual font.
6. Occasionally the MS Office 2008 Font Cache causes problems when you replace an older version with a newer one. If new features are not evident in Word 2008 after you update the font and restart Word, then quit Word, delete the file ~/Library/Preferences/Microsoft/Office 2008/Office Font Cache (12) [~ indicates your home user directory], and restart your computer.
Location of installation: fonts are installed in /Library/Fonts if you chose Computer in step 3 or in username/Library/Fonts if you chose User in step 3.
What is installed: the names of the font files are newathu.ttf, AttikaU9reg.ttf, BosporosU7reg.ttf, KadmosU11reg.ttf, while the names of the fonts themselves in font lists are New Athena Unicode, AttikaU, BosporosU, KadmosU.
Installation in Windows XP and higher
Extracting the files from the ZIP archive
What you download from the sales site is a compressed ZIP archive. In Windows it is possible to double-click on the .zip file and see its contents, but those contents will not work. You must extract the files, which will produce a folder called GreekKeysUnicode2008. Inside that folder are the usable files you need (the document QuickStartWindows.pdf, the full user's guide, and the keyboard installers and fonts).
To extract the uncompressed files, right-click on the icon of the .zip file you downloaded and select the command Extract All from the menu that appears. In XP, if you select the archive, you will also see the command Extract All available in the sidebar as an alternative.
If you are upgrading from a testing version of GKU for Windows
If you have a testing version of GreekKeys Unicode keyboards already installed, uninstall it EITHER by running the same setup.exe file from which you installed it OR by using the Control Panel Add or Remove Programs.
Running the installer
You must have administrative privileges on the computer in order to install and activate this keyboard. If not, the installation will fail, but the installer may not tell you this is the reason.
1. Save your work in open applications and close them.
2. In the GreekKeys 2008 package (downloaded or on CD), the folder entitled GreekKeys Windows Installers contains a separate folder for each localized version (us, uk, german, french, italian, spanish, frSwiss, danish, dutch) and for the two symbol keyboards. Open the folder corresponding to the installation you want, and double-click on setup.exe in that folder.
3. The MS Installer may give poor feedback about the installation. An initial dialog may come and go so swiftly that you can barely read it. Simply wait patiently until another dialog comes up with a message that the installation was completed successfully. Or, if the keyboard of the same name is already present, a dialog will instead ask whether you want to remove it or repair it (that is, reinstall over it).
4. Restart your computer. (This is the best way to avoid anomalies in the listing of keyboards after an installation.)
Installation in Windows 7 or 8
Please see the separate pages about compatibility with Windows 7 or Windows 8 for information about installing under those version.
Activation of GKU Windows keyboard
With Windows Vista or Windows XP, the Installer not only installs the keyboard in the required location, but also activates it.
Normally, after a successful installation and restart, the Language menu will be visible if it was not visible before. This menu shows (on a system running in English) a small EN [=English] in a dark blue square background as the leftmost icon among those at the right end of the taskbar. The icon may appear almost right after restart, or it may appear after a while when you open something new, either the Regional and Languages Options control panel or Word.

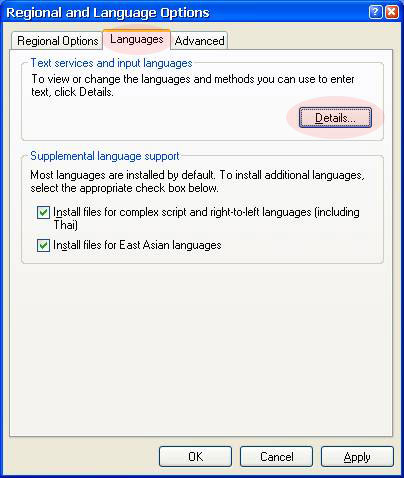
KNOWN PROBLEM: on some Windows systems, the Language bar is not turned on by default, and the installer does not change this setting, so it must be changed manually in the Control Panel. Open Regional and Language Options, pick the Languages tab, click on Details…, and click on the Language Bar… button in the bottom portion of the dialog. Then check "Show the Language bar on the desktop."
Manual activation may be required in some situations. In Windows Vista or XP, if there are multiple users on your computer and a user different from the one who installed the GKU keyboard wants to use it, that user will have to follow the steps for manual activation. Similar steps are always required in versions of Windows earlier than XP, in which the GKU keyboards may work on an unsupported basis.
The following uses the terms applicable for XP; some of the terms are slightly different in other versions, but the same sequence of actions applies. The Text Services and Input Languages pane can be opened in one of two ways.
EITHER
A.
1. Open Control Panels (using the Start menu). [Use the Classic View for quicker results.]
2. Open Regional and Language Options.
3. Click on the Languages tab.
4. Under Text Services and Input Languages click on the button Details… [This Control Panel also gives access to setting keyboard shortcuts for changing the input.]
OR
B.
1. If the Language menu is already visible in the taskbar and you see a tiny white triangle for Options, go to step 3. If not, click on the Language menu icon to reveal of a menu of options.
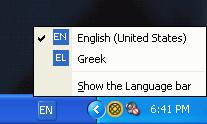
2. Select Show Language bar. This toolbar will now appear on the screen, usually at bottom or top. It can be minimized into the taskbar. You will now see a tiny white triangle for Options.

3. Click on the Options triangle and select Settings…
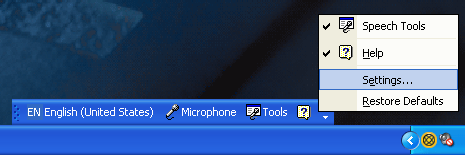
4. This will bring up the Details… display of Text Services and Input Languages.
THEN
5. On the Text Services and Input Languages detail pane, click on the Add… button in the Installed Services section.
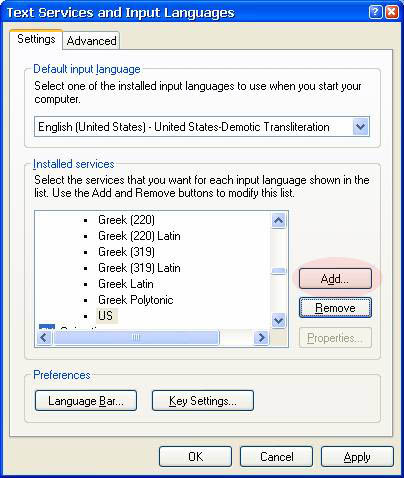
6. On the Add Input Languages pane, choose Greek from the list of options in the top field (Input Languages).
7. Now examine the checkbox next to Keyboard Layout/IME label of the second field. Check this box if it is not already checked.
8. Click the arrow at the right of the Keyboard Layout field and scroll in the list of choices revealed. Select the item you installed.
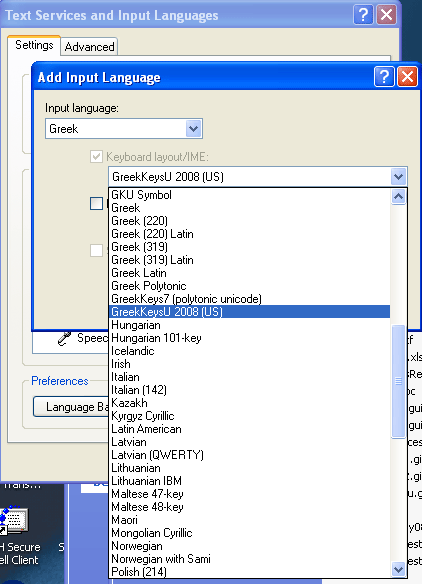
9. Click Apply and then OK to close the pane.
Windows Font Installation
You must have administrative privileges to install or remove fonts. If you do not have such privileges, adding Fonts will fail, but you may not receive feedback telling you this is the reason for the failure.
1. Save all your work in open applications and exit those applications.
2. Open the Control Panel Fonts.
3. If you have previously installed earlier versions of New Athena Unicode, AttikaU, BosporosU, or KadmosU font, remove them. Select them in the Fonts window and then (in XP) select the Delete command under the File menu, or (in Vista or XP) right-click and select Delete from the menu.
NOTE: if you are told that the font cannot be removed or if it continues to be present in the Fonts Window, this probably means the system thinks the font is still in use. Restart your computer and then open the Fonts Control Panel and try again before running any other program.
4. Now, in XP, select Install New Font… under the File menu; or in Vista, right-click in the Fonts window and select Install New Font… from the menu.
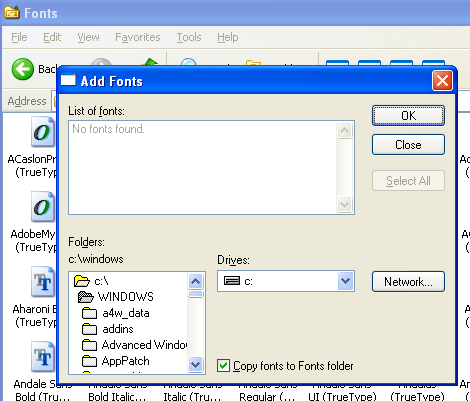
5. In the Add Fonts window, navigate to the folder Unicode Fonts in the GreekKeys 2008 package (or to whatever location you have copied them to).
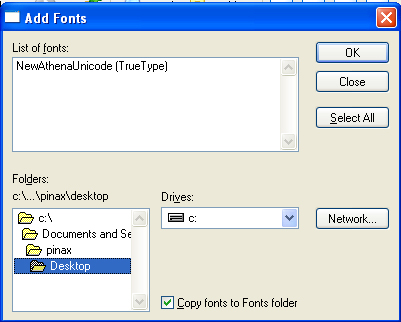
6. When the names of the fonts in this folder appear in the upper field, click on Select All and then OK (or select particular fonts if you do not want to install all).
|
